Showing posts with label clothing. Show all posts

Wednesday, May 29, 2013

15th Century hats and capulets

Recently a friend was sewing some new later period 15th Century Italian dresses for herself and her daughter and I offered to make them proper head wear to go along with their new lovely dresses.  I knew I had made a very simple Italian hat before but I wanted to give her options and this is the one she decided upon. 


"La Bella Principessa" Memorial or wedding portrait of Bianca Sforza [married and died 1496], legitimised daughter of Ludovico Sforza Dated c.1495-6.  

After getting her measurements I started out by making the top back piece out of a woven gold metallic fabric trim.  This was something I picked up years ago and never knew what I was going to use it for but knew I might need it some day.  Once I cut it and added the outer trim I gathered the bottom and sewed it in place and added the pearls.  Once that was finished I used some of the fabric from her dress to create a tapering tube.  Because my friend Amy has short hair she would not be able to braid it and place it inside the tube to hold the shape of the headdress so I had to stuff the tube lightly with cotton stuffing to help hold it shape.  I then wrapped with metallic trim and used pearls securing it all the way up the tube leaving a little opening in the back so she could make a small pony tail and place it inside the tube and then she would wrap the end with the remaining trim and pin it in place.  Below is the finished product before I mailed it out.  I am hoping to get a picture of her in it soon.


As for her daughter, instead for making a full headdress I made her a simple 15th Century Italian Capulet. I made a pattern from her measurements and then on the pattern began to weave the trim and tacking it in place with pearls.  Afterwards, I handstitched the trim edge and added the ties.  Last came the outer layer of pearls on edging. 


Sunday, January 27, 2013

Viking hat (Birka cap)

Recently I worked on a Viking cap or a 4 panel Birka cap for a friend.  I wish I would have taken more pictures but I have a few below.  The cap itself is made of black wool with a linen lining.  The decorative stitching on the cap is a wool and cotton/linen blend. 


I used a double herringbone stitch with red and gold yarn/floss and a white wool yarn as an added stitch overlapping the herringbone stitch.  I have never done this complete combination of stitches before and I was pleased with the outcome.  My friend seemed happy as well.  


Wednesday, January 2, 2013

New year and new post

Well it is a new year and my New Year's resolution is to post every other week things that I am working on.  I have been very lacked in that respect.  So to catch up I will post some things that I have been doing.  I have attending demos and built a new bread oven as well.  Made more hats and currently working on some hood and clothing.  

Happy New Year Everyone!  

Wednesday, August 22, 2012

Getting cold....here's your Birka cap

I love the black stitching on this red wool four panel Birka cap.  It really stands out.  Although it might look like Ric-rac trim it's actually a period herringbone stitch on the seams.


The Birka cap is hand-sewn and the red wool is felted and holds it's shape so well.  I did line this cap with a black linen fabric also hand stitched.  


The coloring in the fur really complements the red wool and the black period herringbone stitching really well I think.  The class to for creating this simple style of hat is posted on the blog. 

Going Viking....

Vikings have invaded my home again.  In the previous couple of weeks I have been working on a three panel apron dress.  I have never made a three panel before but know the do exist.  So, not that this was a challenge, because I have made several four panel dresses but it was something new and different which is always a good thing.  I really like the color of the wool and it was soft to the hand and light enough to layer. 


The stitching came out nice and neat.  And the gores and seams I used a simple running stitch and a herringbone stitch along the top.  


 The only problem....it's a little too big!  And I don't mean the stitches.  The dress needs to be taken in two or three inches so I will be taking out the top stitching and the seam stitching and taking it in the back and from seams, then re-stitching.  Good thing I am somewhat fast with hand stitches (simple stitches) and I love to hand sew. 

Butter churning beauties.....

The girls really enjoyed teacher butter making during my bread class.  This was the third time the taught butter making.  Although, they were a little more shy this time.  The butter did get made though and enjoyed with the rolls made during class. 


This picture was actually taken at a demo we were doing in June.  The girls look so cute with there smocked aprons and there head wraps.  They wanted to look just like Mommy.  


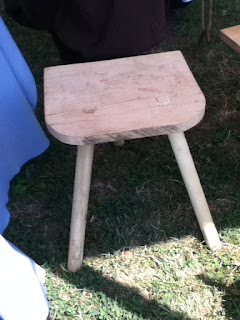
A closeup on the churn  You can see one of the little three legged stools in the back ground their Daddy made them.  


  Here is a closer look at the stool.  They are the perfect height and the girls just love them!


Monday, June 18, 2012

Medieval hood


For the last week I have been working on a super secret project.  My daughters and I have been working on a hood for my husband for Father's Day.  I marked out the wool and the girls took turns cutting it out.  They also took turns sewing it on their little sewing machine.  They did a great job.  I did the embroidery "loosely" based off  hoods I have seen in various manuscripts.  The embroidery is done in white wool.  We still need to cut out, sew and add the lining which will be black linen.  Unfortunately this picture does not do the color of the wool justice.  The hood is a beautiful royal purple.


Friday, June 1, 2012

Fillets

Lately I have been thinking a lot about fillets.  I have never really finished I have been working on.  As I was looking for something else the other day I came across one that is still a work in progress...a pleated fillet.  I am thinking this is going to be a project to work on after I finish the smocking class in the next couple of weeks and might be my next class project.  I have always liked fillets but have only worn them a few times.  Perhaps it's time to revive the look and make a couple for my daughters as well.

What lies beneith....viking style

So as I mentioned before I found some interesting information the book Viking Clothing by Thor Ewing By Tempus Publishing Ltd. ISBN 0-7524-3587-6.   Line drawings of skulls found in graves at Birka (Bj. 707 and 946) showed braided bands on the skulls that were believed to be worn as headgear.   You can see that the braids are in two different positions.  I really think the one on the right might have been used as an anchor for other head cloths.  Maybe a scarf or even a short veil.  Or a combination of a several styles to keep warm.  As you need you could just remove or add.  The one of the left reminds me of a woven band that may be used to go over top of a veil or scarf.  And these are not the only braided bands found, apparently they are 8 total mentioned comprising of both these positions on the skull.  I think an upcoming project is going to be a braided band.